Key Takeaways
- You need to begin with careful planning that can enable your project to start smoothly and stay on track throughout every stage.
- Using the right tools and material reduce waste and improves results effectively.
- Proper preparation and implementation of the technique can make you save time and cost on future fixes.
- The clean-up and touch-ups are essential steps that finish your projects finely and protect your work.
Did You Know?
“According to the remodeling Magazine’s coat vs. value report 2023, a well-painted home exterior can yield up to 55% return on investment.”
The scent of the fresh coat of paint always gives me a pleasant feeling. Sometimes it takes me back to the days when I was prepping for my home’s painting.
It took almost a month to outline and execute the painting project. Because painting may seem simple but skipping the small details can lead to messy corners and uneven coats or wasted time and money.
Are you also planning to get your home painted? If yes, then scroll down and read the article.
In the guide, I will tell you everything you need to know, from planning to choosing the right tool to mastering the finishing touch.
Planning Your Painting Project
It was a great initiative when I started planning before dipping the brush into any color. Because it helped me avoid mistakes, save money, and give a clear vision before the first drop of paint lands.
Let me tell you what you should do:
- Choose the right color palette for designing and matching the aesthetics of your house.
- Keep in mind what and where you are painting to avoid confusion and ensure nothing gets missed.
- Pick out the best paint quality by testing small patches first, which gives a demonstration of the right coating on the material.
- Set a timeline and stick to it for preparation, painting, drying, and finishing.
- Last but most important, budget everything–from brushes to extra costs, to avoid paying a huge amount.
Pre-planning helps prevent mistakes and makes the process smoother. But if you want to hire professionals, Peoria painters will assist you the best.
Interesting Fact“Some research shows that particles of paint can cause more microplastic in the ocean than any other plastic materials itself.”
Gather the Right Tools and Materials
At the time of my room’s wall painting, I did not have enough tools for a sleek finish. So my designer friend suggested having some essential painting products.
In this section, I have listed all those tools:
- Paint, rollers, and brushes of different sizes.
- Tape to protect trims and edges.
- Cloths or plastic sheets to cover furniture and floors.
- Painting trays and stir sticks.
- A ladder for reaching high spots.
- Cans of primer.
- Sandpaper for surface prep.
The right tools and materials can make the work faster, easier, and more professional. Make sure to use quality paints, tools, and materials to get a long-lasting finish.
Application Techniques for a Flawless Finish

Applying every layer of paint gives another level of satisfaction. But one mistake can ruin the whole texture finish.
You need to follow these techniques that provide a polished look to your wall:
- First things first, clean dirt and dust, repair cracks, and sand rough spots to prep the surface.
- Apply the primer on the wall if you are changing from dark to light color.
- Use of brush to paint corners and adjust before using a roller to define the edges smoothly.
- Try the W or M motion method to avoid streaks and lines of coating over coating.
- Do not rush between the coats; let the first layer dry fully before applying the second.
- Lastly, avoid overloading your roller with a brush with excessive paint because it can lead to drips and uneven patches.
I have attached an infographic below for a better and quicker understanding of the steps.
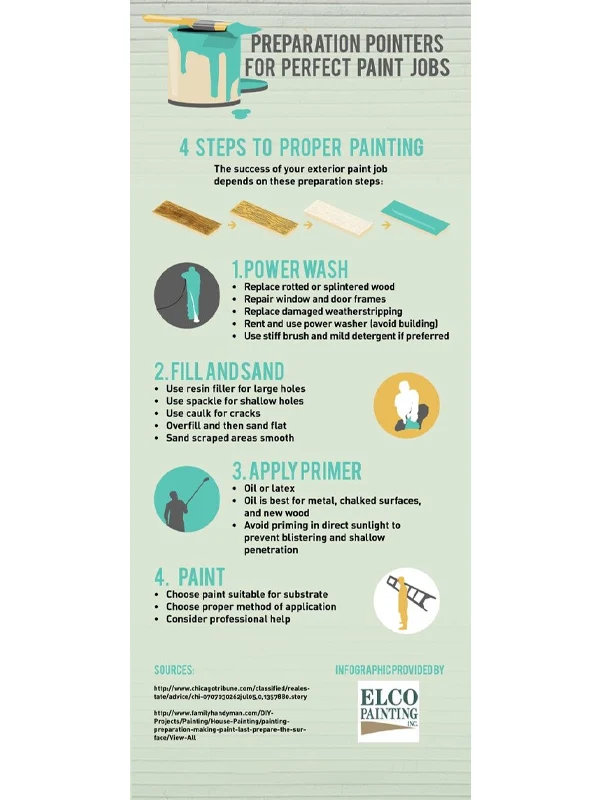
These are the basic application techniques that ensure a flawless finish to your wall and other highlights.
Finishing Touches and Clean-Up
Now comes the most delicate part, finishing touches and clean-up. In this, one wrong step might make you start the process all over again.
Well, I am suggesting to you some of the key points to meet the eternally satisfying finish.
- Slowly peel the painter’s tape after completely drying. This keeps the corners neat and prevents the peeling of fresh paint.
- Don’t go to dispose of paint; rather, use the leftover can for tiny touch-ups and small flaws.
- Make sure to clean tools properly using suitable agents and keep them ready for the next job.
- For future fixes, store extra paint in tightly sealed cans only.
Remember that finishing finally not only leaves a great look, but also makes future painting processes smoother.
How to choose the right paint quality according to the surface?
Start with testing on small wall patches to check the right paint quality that suits the surface.
Can one brush be used for all paint types?
Start with testing on small wall patches to check the right paint quality that suits the surface.
How to dispose of the leftover paint?
For an eco-friendly option, take the leftover paint to a nearby waste center that recycles it.
Which one is better: hiring professionals or doing it yourself?
DIY saves money, whereas hiring professionals can speed up the work and provide a better finish.
How long should the paint dry before applying the second coat?
Usually, it takes 2 to 4 hours, but you can check the painting container’s label instructions. Besides, humidity and temperature can be other factors that can affect the drying time.
