‘The first rule of restoration is that no piece of furniture is worth a human life. Safety is the foundation of every successful rebuild.
Facing a home damaged by a storm, flood, or fire is overwhelming. It is more than just broken walls; it’s your sanctuary in ruins. This guide is here to help you move from that first moment of shock to the finish line of a fully restored, safer house.
We will break down the practical, financial, and physical steps you need to rebuild your home. Whether you are dealing with water, wind, or smoke, the goal is to help you navigate the chaos and turn the page toward a fresh start for you and your family.
Key Takeaways
- Never enter a damaged property without official clearance.
- Photos and videos are the currency of insurance claims.
- You have less than 48 hours to prevent mold growth, so dry your home fast.
- Use the restoration as a chance to add new and resilient materials to your home.
What is Post-Disaster Home Restoration
Restoration is more than just cleaning up damage or repainting walls. The process includes several steps that work to restore a property to its original state after damage while also enabling improvements. The process takes multiple stages to complete.
The first step will require making the building safe through construction work that establishes structural stability. The team proceeds to clean the area, after which they perform sanitization work to eliminate all health hazards. The team works to fix all the broken components through restoration or complete reconstruction.
Restoration in 2026 goes beyond repairing damaged property. The process combines two elements that include developing advanced materials with intelligence to enhance future protection for the property. The aim is to create homes that can endure extreme weather conditions while remaining operational during emergencies.
You can think of restoration as the step that will connect the chaos of an emergency to a fresh, safe, and comfortable living space.
Step 1: Assess the Damage and Ensure Safety
You need to wait until the whole area is completely safe before you begin your repair work. After a disaster, there are many hidden dangers that exist, including weak floors, gas leaks, and damaged electrical wiring. You should only enter the property when the local authorities give permission for the same.
When you go inside, you must always wear proper protective gear. This includes strong gloves, an N95 mask, and sturdy boots. Having these items will keep you protected from dust, harmful substances, and sharp objects.
Fun Fact: Some new concrete can fix its own cracks over time, making homes stronger and longer-lasting.
While you walk through the damaged space, you should look for danger signs like cracked ceilings or anything that doesn’t seem normal. Make sure you look away from anything that looks unsafe.
You can begin planning your next steps for repair and restoration after you have confirmed that the area is completely safe.
Step 2: Document Damage for Insurance Claims
At this stage, smartphone plays an essential role. Before you move anything, take clear pictures and photos of every room from different angles, including the closets and drawers. This record will help you prove the condition of your property after the damage has occurred.
Insurance companies use these proofs to process the claim. Also, make sure to make a detailed list of damaged items along with their value and age. Keeping everything organized in a digital spreadsheet makes the process easier and ensures that you get the support needed for quality restoration without any financial stress.
It is advised that you store your files through an online backup that will protect the important records. The process will allow you to provide the documents to your insurance company whenever you need their assistance.
Also, you should avoid throwing away any expensive damaged items until the insurance company has seen them or given you written permission to discard them.
Pro Tip: Keep a record of every phone call with your insurance agent, including the date, time, and all the things that have been discussed.
Step 3: Remove Debris and Begin Initial Cleanup
This is the hard work phase, where you actually begin cleaning up the damage. Get rid of the furniture that is badly affected, like soaked carpets or burnt tables, to clear the area as quickly as possible.
If water damage has occurred, you need to act fast. Mold can begin growing within 24 to 48 hours. To prevent this, you can use strong dehumidifiers and air movers to remove moisture from walls and floors. Drying the space properly at this stage is very important to avoid bigger problems later.
You should also open windows for ventilation if it is safe, remove standing water, and keep checking the moisture levels to make sure that the area is drying evenly.
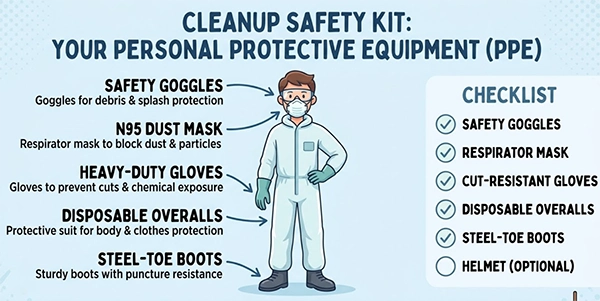
You can take an idea from this graphic that shows all the safety gear needed to stay protected and healthy during any major cleanup job.
Step 4: Restore Structural Components and Utilities
Now that the house is somewhat clean, it is time to check its main systems. This includes the heating and cooling system, plumbing, and electrical wiring. Disasters can cause hidden damage to pipes and wires, which may lead to leaks or even fires later.
Every part of your house needs to be inspected by a certified expert. The technicians will restore your home security by either repairing existing components or by installing new equipment. You can protect your home through better fire protection and improved insulation materials that increase your property’s security.
Installing the systems is not the end; they also require regular maintenance checks that will help you identify future problems while maintaining system performance.
Step 5: Repair Interior Spaces and Replace Damaged Fixtures
This is the stage where your house will begin to feel like home once again. New walls are put up, floors are installed, and all the cabinets are fixed in place. Everything will begin to look normal and comfortable.
Since you are rebuilding, it is a good idea to make improvements. If you plan to make your home easier and more comfortable to live in, you can try adding features like wider doorways or better lighting.
You are not repairing the damage to your house; you can use this opportunity to add new and better things to your home and replace the ones that you don’t need or the ones that you wish to change.
If your home was made several years ago, you can choose modern designs now and also use durable materials that will long laster.
Step 6: Improve Preventive Measures for Future Disasters
“Build for the storm of tomorrow, not the sun of today.”
The best way to deal with future disasters is to prepare your home in advance. In 2026, the focus is on making homes stronger and more ready for any emergencies.
- Flood-Prone Areas: Install initial sump pumps with battery backups and raise the electrical outlets to reduce water damage.
- Storm-Prone Areas: You should invest in impact-resistant windows and strengthen your roof with reinforced clips.
- Fire-Prone Areas: You can also use non-combustible materials and keep the area around your home clear to slow down the process of fire spreading.
These simple steps can make a big difference in the future. They help you protect your home, reduce the damage, and keep your family safer during unexpected situations.
Did You Know?
Standard homeowners’ insurance does include ‘rising water’ (floods) unless you have a specific NFIP policy.
When to Hire Professional Home Restoration Experts
Doing small repairs yourself can be a good idea, but major disaster restoration is a different thing that can’t be done alone. This task requires specific tools that only trained personnel can use.
The team uses thermal cameras that are used by high-level professionals to locate hidden moisture within the walls, while they use powerful air purification devices to get rid of dust, mold, and other dangerous particles.
Some issues can’t be seen, but they can cause some serious damage later, such as sewage backup, structural damage, or widespread mold. Attempting to fix these problems without help can create more complications, which could also affect your health.
Hiring professionals becomes necessary for this situation. The experts use safe procedures to manage the restoration of your property. They ensure that your home remains safe through expert restoration services that offer complete protection of your property.
Ques: How much time does the restoration process take?
Ans: Times depend on the type of damage. For small issues, it takes only a few weeks, while for huge damages it may take months.
Ques: Will my insurance cover all the costs?
Ans: Coverage depends on your policy; you can check the details carefully.
Ques: Who should I call first? My insurance company or a restoration contractor?
Ans: To get a claim first, you should call your insurance company, but if you want to prevent further damage, it would be better to call a restoration contractor.