


A leaky faucet might look like a minor issue but can cause major damage, including wastage of water, costing $20 a month. To fix a leaky faucet, you may need a screwdriver, pliers, a wrench, and tape. Now, how to fix a leaky faucet? First, close the valve and then disassemble the faucet; next, check the damaged part, replace it, and lastly, fix the faucet back; the leakage is gone.
In this guide, I’ll tell you the step-by-step process for fixing a faucet or replacing it, with a list of all the tools required. Here you will also read about the common issues and their solutions.
Quick Answer:
To fix a leaky faucet, Start by turning off the water valve; then remove the handle to replace the defective parts like the springs, O-ring, washers, or inner cartridges. Lastly, reassemble the faucet and turn on the valve to check whether the leak has stopped properly or not.
How to Fix a Leaky Faucet?
To fix a leaky faucet, close the water valve, disassemble all the parts of the faucet, block the drain, identify the damaged part, replace the part, and lastly reassemble the faucet; it will be leak-free. If you are wondering, “How to fix a leaky faucet without tools?” The process is simple: just open the faucet, clean the mineral deposits with warm water and vinegar, then reattach it and let the water run for 15 seconds.
Let’s take a look at the steps for fixing a faucet with the help of tools and without tools in detail.
1. Fix a Faucet with Tools
Start by opening and disassembling the faucet, then identify the damaged part and replace it; at the end, reassemble the faucet. Now your faucet is fixed and leak-free.
Take a look at each step in detail.
Step 1: Open the cap
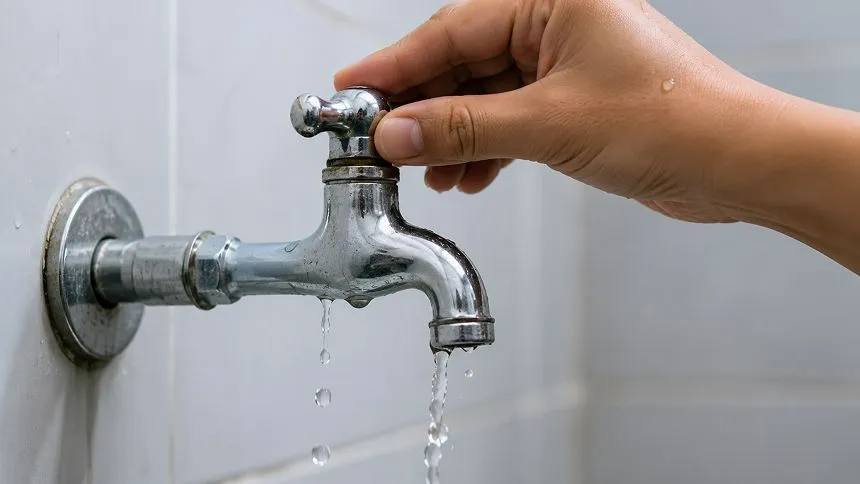
First, close the faucet valve to stop the flow completely. Then turn the faucet so the remaining water drains out. After the water stops, open the cover of the faucet with the help of a screwdriver. Now, you can see the internal screw and handle properly.
Step 2: Disassemble the Parts
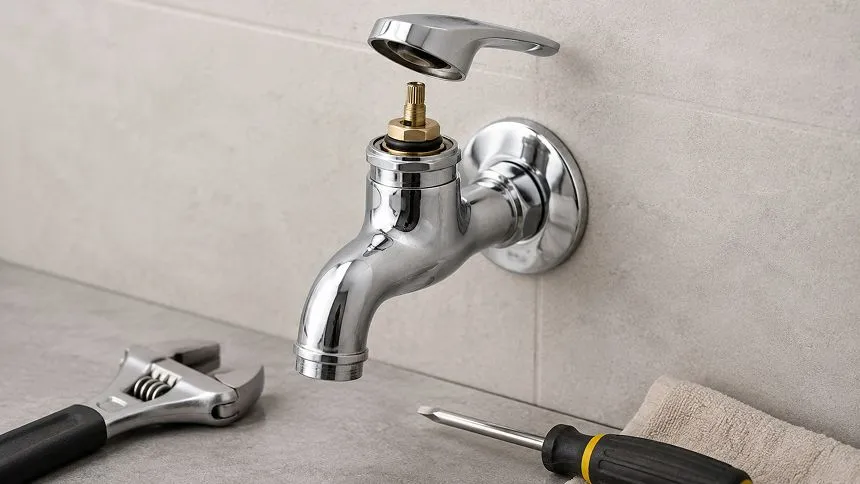
Now open the screw on the cap with a Phillips screwdriver and remove the handle. Next, we have to remove the lock nut with a crescent wrench. Now that the faucet is fully open, you can see and analyze each part for any damage. Make sure to cover the drainpipe so you don’t lose the small parts of the faucet
Step 3: Identify the damaged part
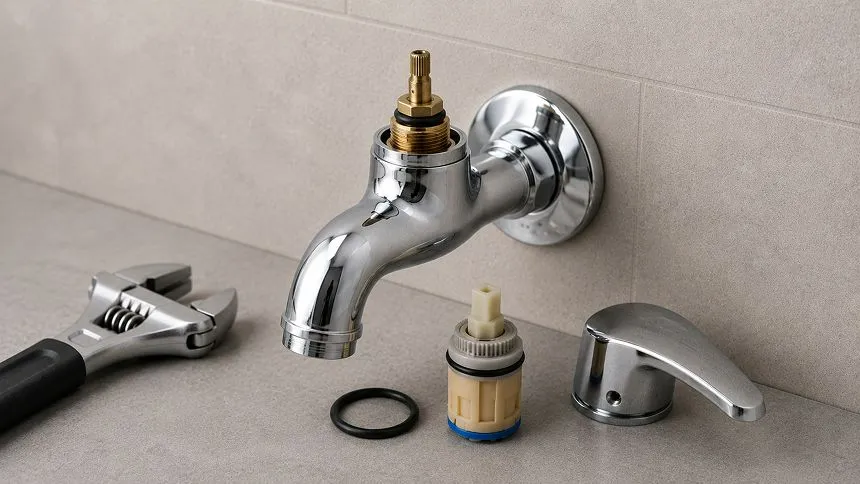
Next, take off the cartridge and the O-ring and analyze them. Whichever part is damaged, you have to change it. Also remember how it was configured because you have to place them back in the same place. While purchasing the new part, ensure that the new part is the same and has a similar size to the old one; otherwise, you can have issues while fixing.
Yourhomify Tip
If you think you can forget the configuration, then you can just take a picture, so you can check and place the items correctly while reassembling.
Step 4: Replace the damaged part
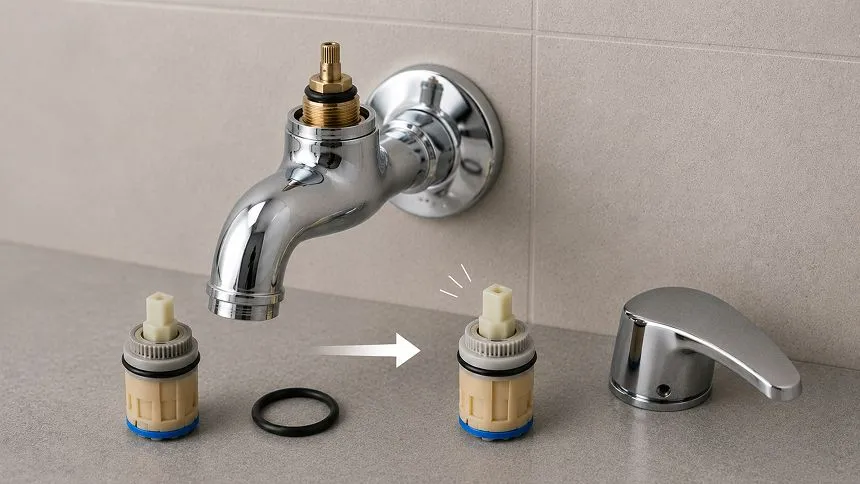
Now that you have identified the issue and you have the new part, start the reassembly process. Change the damaged part and make sure you are placing the parts with the correct configuration.
Step 5: Reassemble the faucet
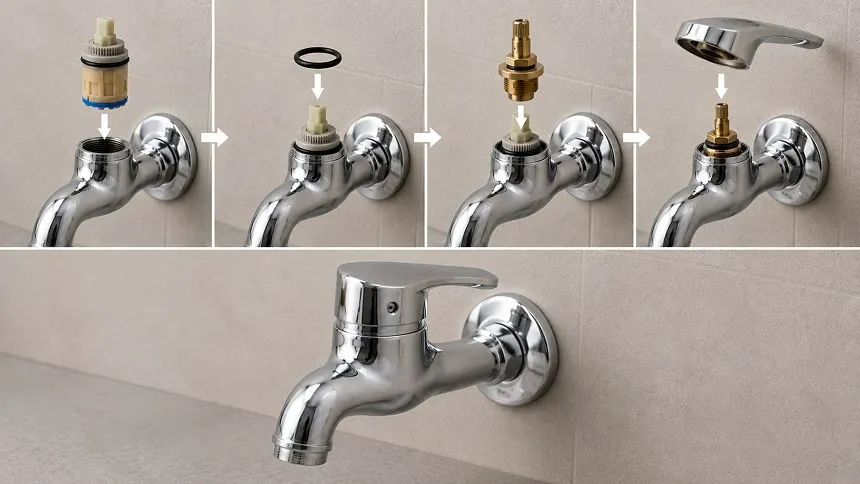
Place the O-ring, then fix the cartridge; next fix the handle, and lastly fix the cover of the faucet. After fixing all of that, turn on the valve and check the flow; do a leakage test. The leakage should stop by now; if it has not, then you may have to replace the other part or the faucet.
2. Fixing a Faucet Without Tools

You can also fix a faucet without tools; just close the valve, open the decorative part by hand, cover the mouth of the faucet with a cloth, then take the aerator out, clean the heavy mineral deposit, then refix the faucet. Lastly, remove the cloth after the dirt leaves, open the water, and let it run for 15-20 seconds.
Read the process of fixing a faucet without tools in detail.
Step 1: Firstly, check if the handle is fully closed or not. Minor drips can be due to an open faucet. Make sure you are doing it gently with firm hands. If the faucet is dripping even after closing it, then you have to repair it.
Step 2: Take a cloth and wrap it around the tip. Then open the aerator with your hands. After opening, clean it with the help of warm water; if you see the mineral deposits are heavy, then soak it in vinegar.
Step 3: Attach the aerator again after proper cleaning, fix it properly, and make sure there is no mineral buildup remaining on it. After reattaching the faucet, remove the cloth from the tip.
Step 4: Now open the valve and the faucet, and leave the water running for the next 15 seconds. This will help remove all the minerals that are settled inside the faucet.
Step 5: After this, check the faucet for any more leaks. In case the problem recurs, there might be an underlying issue. Take professional help for the same.
How to Replace a Leaky Faucet?
Start by closing the valve to stop the water supply, then open the faucet cap, then remove the parts one by one, and take out the faucet at the very end. Then install the new faucet and reassemble the parts, ensuring they are in the right configuration.
Let’s check the detailed process to replace a faucet.
Step 1: Turn Off the Supply
Turn off the valves and stop the water supply; open the handle and let the pressure leave. If you have no separate valve for the faucet, shut the master supply. You can’t remove a faucet or install a new one while the water supply is on.
Step 2: Remove the Handle
Now take a screwdriver, open the cap, and loosen the nut. Then remove the lock nut with a wrench. Take all the parts out; lastly, remove the faucet body with the help of a wrench.
Step 3: Apply plumber’s putty or a gasket
Firstly, clean the sink and the faucet mounting area, then apply plumber’s putty at the base. If you have received a gasket with the faucet, then putty is not required; fix the faucet with the gasket.
Step 4: Start assembling the faucet and spray hose
However, if the faucet has a spray hose. You have to attach it to the faucet. Then, take it and pass it down through the sink’s center opening. Place the new faucet assembly in a mounting hole, and then tighten the nuts by hand after ensuring they are correctly placed and the gasket is aligned. In the end, tighten with the help of a wrench.
Step 5: Check the flow
Lastly, assemble the spray hose to the main supply. After completing the connection, turn on the water supply and check if the water flow is good and there are no leaks. If there is a leak, check the connection; you may need to tighten it.
Tools Required for Fixing a Leaky Faucet
You will need a screwdriver, pliers, an adjustable wrench, plumber’s tape, and the replacement part before you start fixing the leaky faucet. These are the basic tools to open and fix the faucet. Most of the tools are available in households for daily maintenance.
Take a look at the tools required and their uses for fixing a faucet.
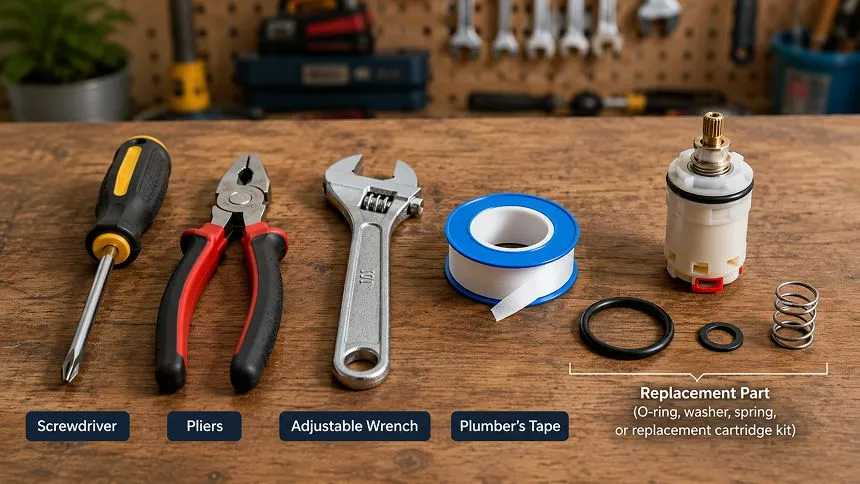
Screwdriver: This will be helpful in removing the handle cap, the decorative trims, and the core assembly screw. Check the faucet type beforehand and take a flathead or Phillips screwdriver based on that.
Pliers: Due to mineral composition and rust, the nuts can get stuck; pliers help in gripping and loosening stuck parts. There are slip-joint pliers to loosen nut packing, adjusting pliers to remove the retaining rings, and lastly needle-nose pliers for old cartridges and tiny springs.
Adjustable Wrench: It is used for loosening and tightening the nuts, bolts, rings, and supply lines. A wrench is a hand tool that has a notched end; it is designed to grip and twist nuts and bolts. You can use a basin wrench for hidden mounting nuts or allen wrench for modern handles.
Plumber’s Tape: This tape helps in sealing pipes and preventing leaks at the threaded pipe connection. This is also called Teflon tape. It is also used in joint sealing. However, you cannot fix a leaking cartridge, washer, or O-ring with the help of this tape.
Replacement Part: Must keep an O-ring, washer, spring, or a replacement cartridge kit with you, and also try to be specific about the faucet brand. Having the spare parts can quicken the process of fixing the issues.
Common Issues and Solutions for a Leaky Faucet
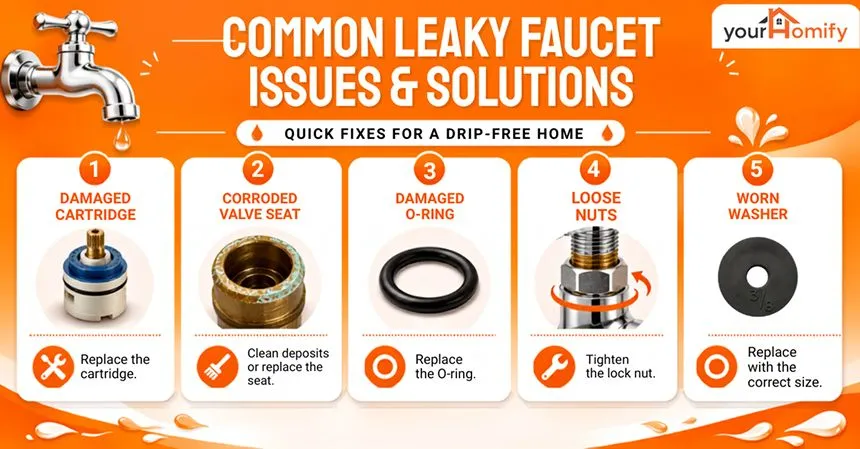
Damaged cartridges, corrosion in the valve seat, loose or damaged O-rings, loose packing nuts, or worn-out washers can be common issues behind a leaky faucet. In that case, you have to replace the defective item. By taking small care steps, plumbing problems can be avoided.
Let’s take a look at the issues and their solutions.
Damaged Cartridge: The cartridge is the central part of the faucet, made of brass or plastic. It controls the water flow; sometimes it gets cracked, or the seal fails, which causes leakage. To prevent it, you have to replace the damaged cartridge.
Corrosion in Valve Seat: Due to high mineral content in water or regular use of the tap, there can be corrosion in the valve seat. It is mostly seen in older faucets. It will also affect the water quality. This valve seat loosens the grip of the rubber washer, and a leak happens. You have to clean the mineral deposit with warm water, and if the deposit is too much, then wash it with vinegar; this can remove the deposit and provide smooth functioning.
Damage in O-ring: The O-ring is a small rubber ring that seals the gap between different parts and stops the water flow when tightened. It can crack due to regular use, which can cause a leak. If the faucet is leaking from the base of the spout whenever the faucet is turned on, then most probably it is because of the O-ring. In this case, you have to dismantle the faucet, replace the O-ring, and reassemble it.
Loose Nuts: The lock nut holds the stem assembly in place. It can loosen if used for a long period of time. If the water is leaking from the handle, then the lock nut is loose, and you have to tighten it. For this, you don’t have to dismantle the complete faucet. Just remove the cap, and there is a lock nut.
Washer Issue: To close the water flow, the washer slips between the metal parts to make a seal every time you close the water flow. With time, it gets hard, deforms, and sometimes it even cracks, which is mostly the cause behind the leak. This can’t be repaired; it should be replaced only. Make sure you are checking the sizes before purchasing.
Conclusion
In the end, learning how to fix a leaky faucet can be hassle-free with the right tools and tricks. You should check the faucet brand and the size before purchasing the replacement part, like an O-ring, cartridge, washer, or the lock nut.
By performing this process manually, you can save on expensive plumbing services. However, in case of recurring issues, take professional help before it causes irreparable damage.
FAQs
How do I stop a faucet from dripping?
There can be damage to a part or corrosion in the valve. Dismantle the faucet, change the damaged part, and clean the faucet. Now reassemble it, and the faucet will start working properly.
Can you fix a leaky faucet yourself?
Yes, the process is simple: just open the cover and screw with a screwdriver, then open the lock nut with a wrench, and check and replace the damaged part. Reassemble the faucet, and the leak is fixed.
What is the most common cause of leaky faucets?
Hardening, deformation, and cracks in the washer in most of the faucets. There can be issues in the ring, cartridge, or corrosion in the valve seat if the faucet is very old.
Why is my sink faucet dripping when turned off?
A washer slips in the valve metal to stop the water flow. If the faucet is leaking while closing, there can be damage to the washer. Open the faucet and change the washer to stop the leak.
How do you stop a kitchen faucet from dripping?
It is very easy: just open the cap and the screw, check for mineral deposits, and if there are any, clean them with warm water or vinegar. If not, then open the complete faucet and replace the damaged part.
How to Fix a Leaky Faucet– Yahoo Lifestyle